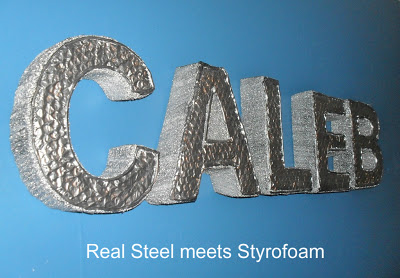
Funky, cool, contemporary, industrial, modern, shiny, STYROFOAM!
All these words describe these faux stainless steel letters. It’s not always easy to find personalized room decor that boys will like, but these look great in my sons bedroom, and he loves them.
This is how to make your own.
- Print your word of choice in any font you’d like onto cardstock and cut out the letters
- Trace the letters onto your sheet of Styrofoam
- Using a hot Styrofoam cutter (or a knife if you don’t have one of those), patiently cut each letter from the foam
- For the look of textured steel, I used bubblewrap. Simply trace the paper letters, just a tiny bit smaller than the original, onto bubble wrap and cut them out

- Spray paint the Styrofoam letters and bubblewrap letters with a metalic spray paint. There are lots of brands and colors available to choose from
- Attach the bubblewrap letters to the foam ones, using a low temp hot glue gun
- To give the edges of the letters a nice finished edge, outline the edges with an all purpose caulk. I felt like I was icing cupcakes at this step.
- When the caulk is completely dry, give the letters one final coat of the metalic spray paint. Voila! You’re finished!

To hang, I simply used small finishing nails, and stuck the foam right onto them. These letters are lightweight, and easy to handle. You can make them as large or as small as you’d like. I printed mine in 550 size font, and cut them from a large 2 inch wide Styrofoam sheet. There are many width options available in these sheets.
These faux steel letters would work well in a contemporary nursery, playroom, and even kitchen. The sky is the limit as to what words, sizes, and colors you can create!
Thank you to everyone who voted,
this project was a finalist in
Season 6 Week 3 One Month to Win It {Craft Competition}
Season 6 Week 3 One Month to Win It {Craft Competition}
which means I’ve made it to the top three, and will be moving onto the final round, yay!


What a neat project! turned out awesome!
Lina
loved this project Molly! CONGRATS!
awesomely eye catching come see me at http://shopannies.blogspot.com and see what I shared
Great idea!!! Inexpensive too! Love it.
–Katie
http://www.blah2beautiful.blogspot.com
Creatively Living Outside the Box
What a creative technique! I absolutely LOVE it! Thanks for linking to Totally Tutorial Tuesdays 🙂
This is so cool! Thanks for sharing it at the Tuesday To Do party! You're a List Maker this week! Feel free to stop by later and snag a button!
Smiles!
Jami
http://www.blackberryvine.blogspot.com
good idea, I like it…
very nice, liked it… hope you come up with more ideas for styrofoam…