This Wibbily Wobbly Timey Wimey Tardis dresser makeover
Is
So
Amazing!

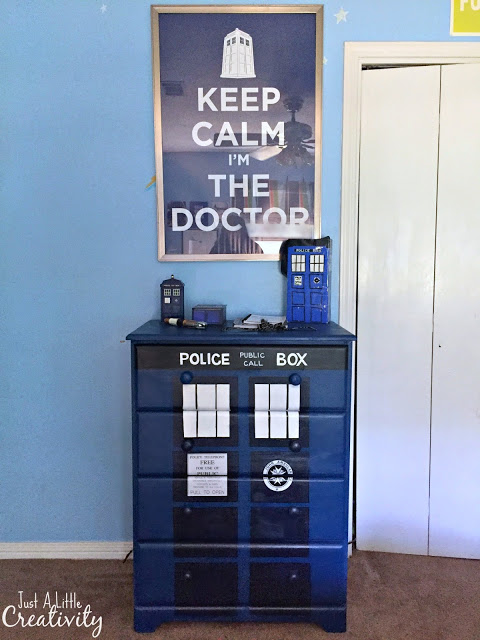
This hand painted Dr. Who Tardis dresser is part four of my boys room makeover projects, and I think maybe I saved the best for last. For photo purposes I moved it to the same wall as our Star Wars BB8 Droid dresser, but it’s actually housed on the wall adjacent to their beds
If my eight year old is crazy for Star Wars, my ten year old is crazy for Dr. Who.
And because they share a room, I chose a color pallet that worked with all their different “favorite things”
This dresser also began as an unfinished wood piece that’s been sitting, well, unfinished in their room for years. The difference in this one and the one I used for the Star Wars makeover was that this one didn’t have stickers and marker all over it. It was perfect to begin creating on.

I purchased two 8 oz bottles of FOLKART Chalk in Nautical but only used about 3/4 of one bottle to cover the entire dresser. I couldn’t believe it. I’ve used many kinds of chalk paint, but this brand is definitely up there as my favorites right now. The price is right, and the color selection is great. One bottle is perfect for small (or medium) size projects.


Gah, sorry for the crummy photos, but I realized that the photographs I took in the room I was working in didn’t turn out at all. And once I was finished with the dresser, well obviously then it was too late to retake them.
Instead, I’ll simply explain that my process involved a lot of measuring, and taping off rectangles with blue painters tape.
I used a navy blue craft paint for the rectangles, and white craft paint for the windows. They were all outlined with a black paint pen when they were finished.
The design wraps around both sides of the dresser.

As for the notice and emblem on the front of the Tardis, a quick Google search was all it took to find and print what I needed. I applied these using a matte Mod Podge.
I free handed the words Police Public Call Box, but you could easily transfer them onto your own piece using carbon paper (one of my favorite tools of the trade when it comes to letters).

I let the dresser dry overnight and then gave it a protective coat of polycrylic, since it will be well loved and used in the boys room.
This is the actual wall it’s on, but you can see the glare from the window behind me in the poster, and it just didn’t work for photos at all. But I wanted you to see anyway, so please excuse my amature photo skillz.
I keep going back and forth about which project of the room makeover is my favorite.
They’re happy with them all. But I secretly think that as long as they have their own bed and their toys, they don’t really truly care about the rest.
Oh, and in case you’re fooled from my photos that their room is super clean all the time now, and their cute little clothes put away in their inspiring dressers, well trust me it’s not.
We’re so human in my house, and their toys and clothes are everywhere.
But hey, at least those dressers cool to look at anyway.

Don’t miss out on all the other projects I shared in this fun room makeover!
Just CLICK HERE to the Boys Room Makeover Part One- How I upcycled a $1 garage sale find into Planet Earth wall art.

And CLICK HERE to see the Boys Room Makeover Part Two-
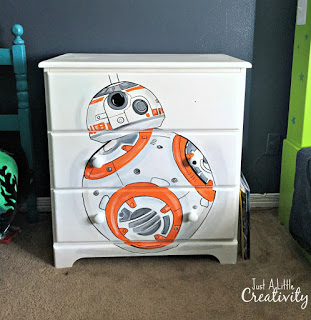
The hand painted Star Wars BB8 Dresser before & after makeover.
And CLICK HERE for Part Three- How to easily make faux metal letters, complete with rounded nail heads.


This dresser is pretty fabulous! You did a really great job. Thanks for sharing! Cynthia
How adorable! I love both dressers you did! 🙂
LOVE the TARDIS dresser! (BB8 is pretty great too!) My 9 year old and I are obsessed with Doctor Who! (And Star Wars, haha) He is trying to negotiate painting our playroom door as the TARDIS 🙂
Turned out great! Thank you for sharing at Merry Monday!
Your Dr. Who dresser and the Star Wars one turned out quite well.
Thank you for joining us at Thursday Favorite Things Blog Hop.
Olivia, co-hostess
Reinvented Collection
Brilliant. Pinned. Bet your son is thrilled.
Joy