This post contains affiliate links

In honor of Dr. Seuss week in my kindergarteners class, he needed to dress as a character from one of the books. I only found about about this three days ago, so I knew I needed a quick solution.
I don’t sew, but I was still easily able to make him (and his little brother) Thing One and Thing Two shirts.
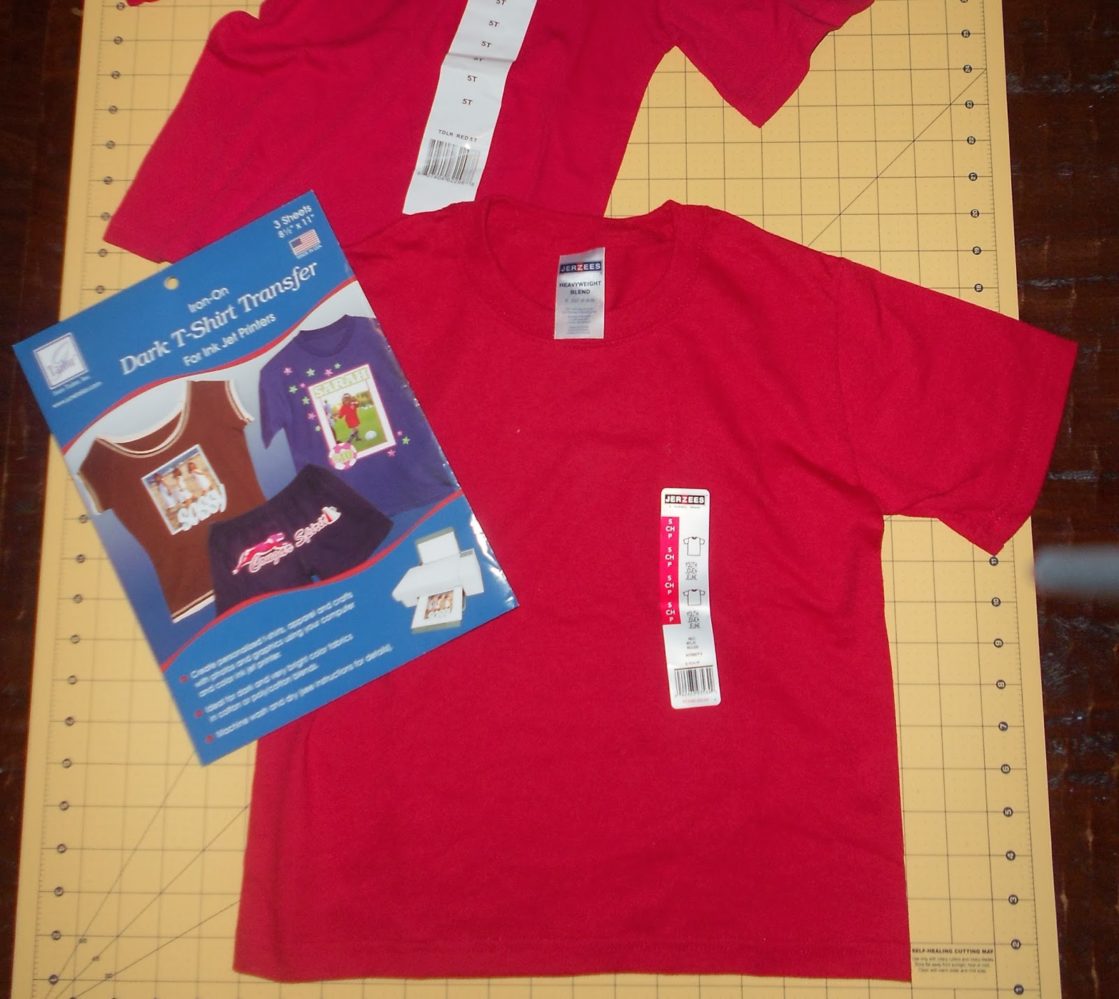
Supplies I used:
Two red shirts
Dark fabric heat transfer paper, for the printer
My home printer
Scissors
An iron
I Googled a Thing One and Thing Two image and printed them directly onto my heat transfer paper.
For instructions on how to create your own Thing 1 Thing 2 graphics using PicMonkey, see my tutorial HERE.
![]()
Next, I simply followed the transfer paper and ironed on the design.

Now, I have to let you know that I ran into a bit of a dilemma at this point. Although I followed the instructions and used the paper specifically for dark fabric, when I ironed the image onto the red shirt, the white areas turned pink. Uh, that wasn’t supposed to happen.
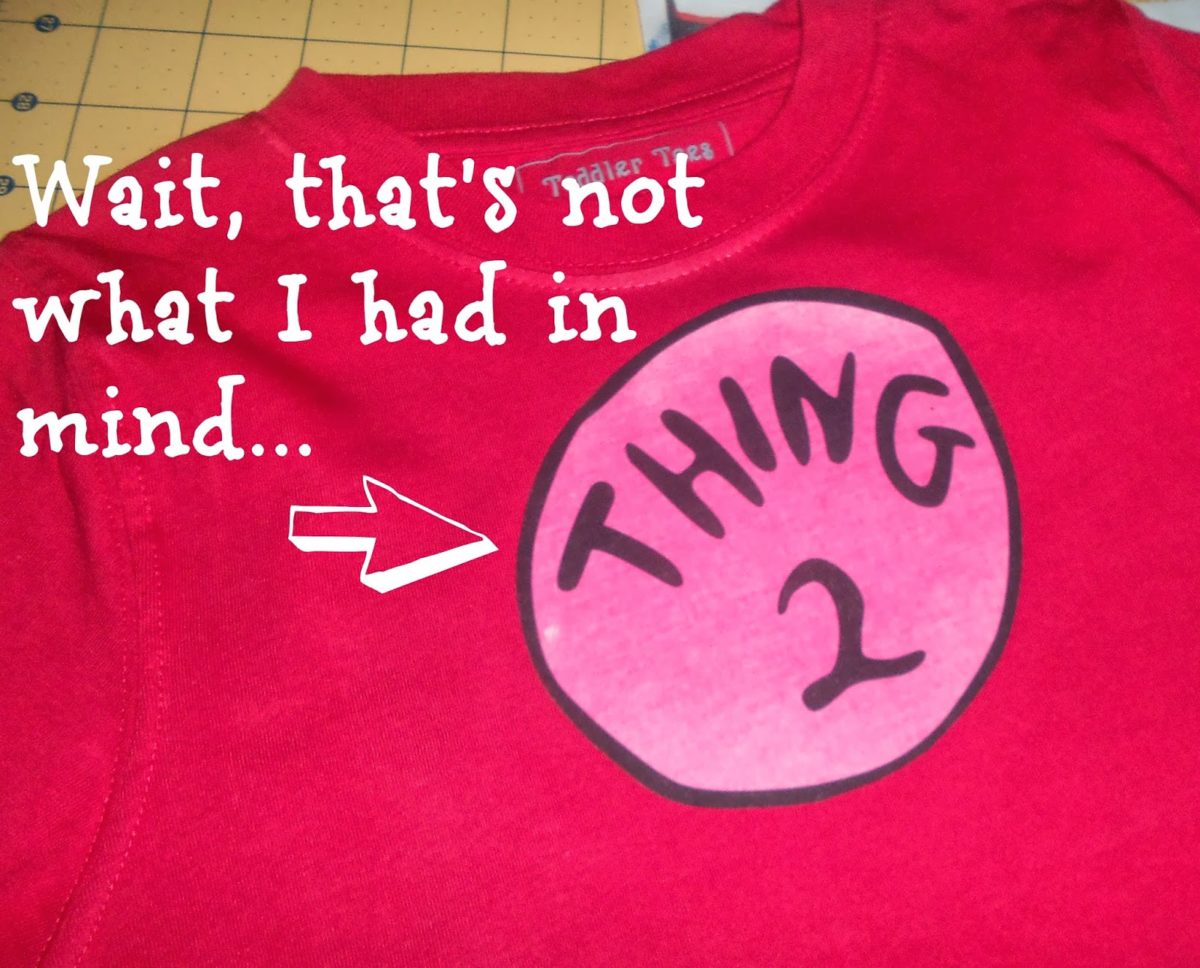
I’ll admit I was in a bit of panic mode, because I only had one extra sheet of paper to use to fix it somehow, and of course no other red shirts.
So, what did I do? I emailed the company to see if they had any advice, and I’m happy to say I promptly received an email back, with more info and a solution. Here is what it said…
I’m sorry to hear about your disappointing experience. There are a couple of things we can try. First of all, I’d be more than happy to send you another package of transfers. With one of the extra sheets, you can reprint your image onto a new sheet, do whatever trimming is needed, and then iron the reprinted image directly over the one with the dye in it. The transfers will adhere to one another. Otherwise, if you choose to start fresh with a new shirt, let it soak in cold water (no detergent or softener) in case there is excess dye in the fabric. Then make sure it is completely dry before applying the transfer. Also, if the shirt is a cotton polyester blend, you may want to lower the temperature a bit on your iron. You may have an iron that runs hotter than normal…”
With the one sheet I had left, I reprinted my image like she said, and guess what? It worked! No more pink! I felt like I needed to share this bit of my experience, so that if you give it a try the same problem might not happen to you. So, lesson learned- MAKE SURE YOU WASH AND DRY THE SHIRT FIRST, OR THE RED WILL BLEED THROUGH.
To complete the costume for school, I used some leftover blue hair paint from Halloween, sprayed it and spiked it, and I had my very own little Thing One!
He was so excited to go to school, he said his was going to be the best day ever!

I haven’t actually tried it myself, but I found this cool wig on Amazon that would probably work really well with your Thing One & Thing Two costumes!

Hey readers!
Many of you have enjoyed this project, and have had a few questions along the way, so I thought I’d help out a bit with the most common ones. Feel free to email me if you need to know something I don’t mention-
1. Where did I get the transfer paper?
I bought mine at Joann’s Fabrics, but the actual company that makes the paper is called June Tailor, and you can purchase it on Amazon HERE.
2. Do you need a special printer?
I don’t think so, I just used my home inkjet printer and it worked fine. I suggest reading the manufactures instructions though on the paper just to make sure yours will work
3. Where did I find the images?
I just did a Google search of Thing One logo and Thing Two logo to find them, but I’ve created a tutorial to show you how to make your own using PicMonkey, find that HERE.


If you like this project, you can find many more of my costume ideas HERE, these are a few…
Three Hole Punch Version of Jim Halpert from The Office

Nerd Day Homecoming costume ideas


Those shirts are darling!! I wish I had thought of that for my daughter today 🙂 Great job, thanks for sharing!
ooooo what fun! I've always loved these shirts, so it's fun to see how you made them. love the blue hair, too. 🙂 thanks for posting!
So cute!! I wish I had thought of for our Dr.Seuss week. And I actually have a Thing 1 and Thing 2….twin BOYS!
That was really nice of them to send you another package! They turned out really cute 🙂
This is just adorable! I found you via Kitchen Fun with my 3 Sons and am a new follower. I'd love for you to link this up to this week's Dr. Seuss theme at Thematic Thursday on DianaRambles.com.
Yea!!! for thing 1 and thing 2 xo
These are fabulous! How cool that the company got back to you in such a kind and helpful way!!
Thanks for sharing! So Adorable!
I love how you even did the hair up Seuss style!
I am a sucker for projects! this one is GREAT! Those shirts cost like 30$ in Disney World and Universal! Post some of your stuff on our site…saving money projects! Thanks for sharing!
Do u need a special printer ?
no
Where did you find the images to print ? I have detached high and low all over Google and can't week to have any luck,and I'm running out of time…..please help me
Hi,
I found your blog when I googled Thing 1 and Thing 2. I LOVE your shirts and would like to make some of my own. Thanks for your step by step instructions, they are very helpful. I am wondering if you could write me at jckrause@hotmail.com to help me with a couple things. I would be so very grateful. I am wondering the same as Amy where you got the images to print and where to buy the special paper.
Thanks so much!
Featuring you today in my Dr. Seuss round up! 🙂
Ginger @ GingerSnapCrafts.com
http://www.gingersnapcrafts.com/2013/03/happy-birthday-dr-seuss-10-ideas-crafts.html
what size images did you search for?
How did you get the white in the circle? I tried making mine, and it came out clear, although I had put in a white background… :/
Did you ever solve the problem? I’m having that same problem right now.
One thing to mention, the Transfer sheets are not meant for those with Laser printers! UGH!
Did you have to reverse the image before you printed it?
I would like to know this as well!
What a fun and clever idea!
I printed a sample of my graphic on paper. The white part did not print this white. (The background in the circle behind thing 1) any suggestions?