
I call this paint technique the lazy girl way to distress furniture. Technically it’s called the dry brush technique, but I like my name for it better.
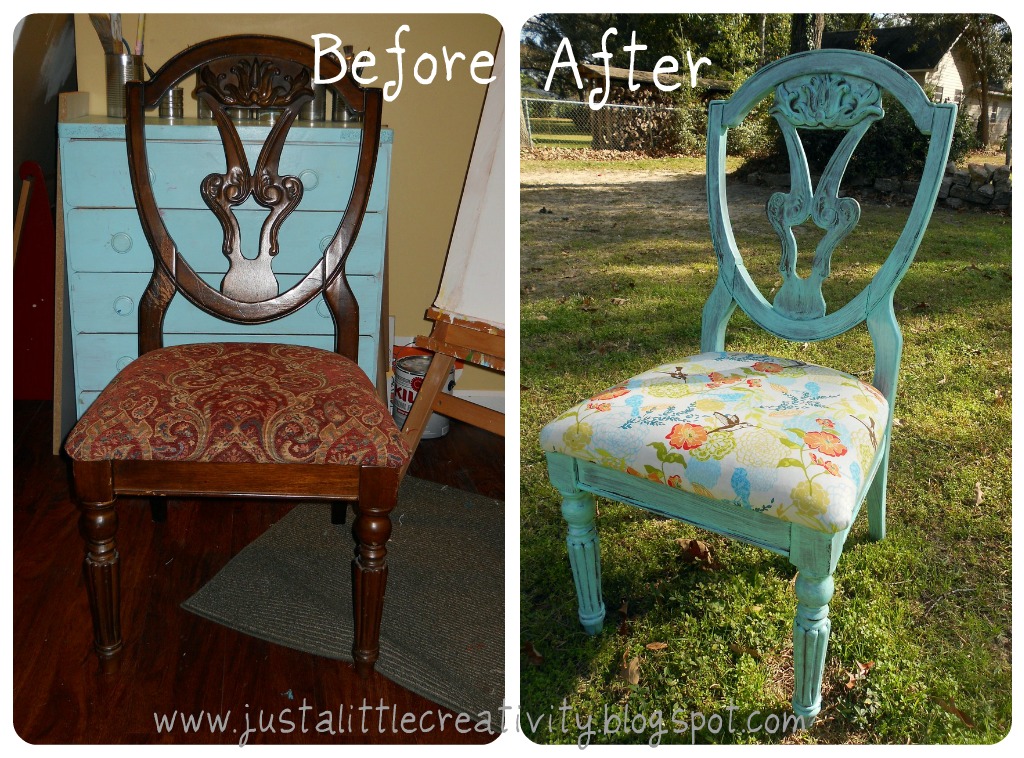
For this project, I found a not-so-pretty chair at Goodwill for only $4.99. It’s a solid wood, Ashley Furniture Co. chair, probably originally a part of a set, with good bones.
A while back I wrote THIS post about recovering an ugly chair, so be sure to check it out.
For the lazy girl dry brush technique, you need a dry scruffy type brush, and your favorite color paint. I didn’t even sand the chair or prime it before I painted it, but you can if you want. Remember, this is the lazy girl method, so I opted out.
For the distressed look, I literally gave it a one coat, “sloppy” paint job. I did make sure that all my brush strokes were going the same direction. In the nooks and crannies, I took an old rag and rubbed some of the paint off.
If you rub too much off, just go back and re-paint. If you add too much paint and it dries, go back with some sandpaper and take off the extra paint.
Seriously, this method is basically fool proof.

I let the paint dry overnight, then I used a clear coat of sealer. You definitely don’t want to skip this step, because it’s what seals the paint in. And remember, I didn’t sand or prime first, so unless I want the paint to continue to rub off, it has to have that final coat of sealer.

For another take on the dry brush, paint rub technique, you can also check out THIS past post on a set of candlesticks that I painted.


If you haven’t already, be sure to enter my current giveaways
You can’t win if you don’t enter!


Molly, I love your redo. You did a great job! The color is so beautiful and the fabric choice for the seat — so cheerful! Now… to find a chair to practice this lazy method! 😉
-Steph
http://www.pendantsbysteph.blogspot.com
This is awesome! It is so pretty! I am going to try this!
Thank you!! I have always wanted to know how to do this! I came over through the blog hop and enjoyed your post!!
Great job Molly. I love the color too!!! Thank you for participating in the Thursday Favorite Things hop. xo
I love it! The color looks cool on the chair.. The technique seems easy.. Thanks for linking up at craftionary.. 🙂
Love
Hani
Haha, LOVE your "lazy girl" method. I tend to be a "lazy girl" sometimes too and it usually turns out just as beautiful as all when I use all those "extra" steps. Way to go – gorgeous fabric and paint color!!
So so cute! I'm loving the fabric you chose for the seat. I'm all about lazy furniture painting, so thanks for the tip!
Really beautiful! Love the technique.
Beautiful! love the colors you chose…and your lazy girl technique!
Would love you to share this at my linky party, Inspire Me Fridays!
I just came across 5 chairs that someone had set out for trash! They look just like your before shot and are in great shape – just a little wobbly. I can't wait to transform them using your method! Love your color choice!
Very nifty! My experience though has shown that even with sealer th paint will eventually come off, especially if hit or scraped against something. Unless it is sanded enough to get the original sealer off (not neccessarily the paint) the new paint, even sealed, will come off way too easy for my satisfaction.
great blog!
It's Beautiful Antiques Furniture
I'd been looking for an easy way to create that distressed look when I came across this blog. Just painted an end table and I am so so so happy with how it turned out! Thank you soooo much!
Only just found your site.I have a bedroom dresser in the kitchen as a kitchen buffet. However after only about 3 years, the wood (or whatever it is-probably the shavings off the floor all stuck together with glue! It is definitely a low grade quality-VERY cheaply manufactured in China as 'French Provincial') on top, has got little cracks in it, even with glass on top, and the paint along the sides of the doors etc. has started to flake .Not happy abt that. It's a flat white, and I want to keep the flat white colour to go with my kitchen cupboards, Would I just be better to give a lightish 'sand', paint, rub off, & then if OK, do the sealer? I am most impressed with the chair etc. It looks beautiful and you would never guess it had once been a "Cinderella". Guess I'm a tad cynical. Your thoughts, if you are able, would be appreciated. TKU, Gabrielle.