
Apparently, there’s a bunch of ways people spell terracotta? I mean, Home Depot spells it terra cotta, Magnolia spells it the other way. I always thought it was tera cotta, with one “R”, but I guess not. Interesting though, the plural form are called terra-cottas, with a hyphen. Because, of course it is.
Anyway, it’s not important. What is important is that we’re all on the same page here when I say I’m talking about the red clay pots. Every year, I pick up a few at Dollar Tree for crafting projects with the kids, and ambitiously planning to plant live things in them. And every year I have a few left over. I generally throw them in the craft box for next time.
So for the March edition of the Craft Destash Challenge this year, I decided to try aging mine (and adding faux succulents to them, don’t judge).
A little about the Craft Room De-stash Challenge-
The Crafty Destash is hosted by C’mon Get Crafty. The challenge to bloggers and crafters is to create something – anything – using primarily items within your own “stash”. You are allowed up to $10 for necessary supplies (i.e. paintbushes, glue, ribbon, etc..)
![]()
I love how Joanna’s aged terracotta pots from Magnolia look, but they’re discontinued. However, they’re my inspiration.
Aged terracotta has a really pretty patina, usually with layers of chippy paint, or dirt, moss, or more clay.
How to Age Terracotta Clay Pots
Supplies:
(affiliate links, meaning I will be compensated if you make a purchase after clicking on my links.)
There are so many tutorials online about ways to do this. There’s no right or wrong way, the fun thing is you just get to pick a way you’d like to try, and go for it!
For this project, I already had everything I wanted to use, including the Plaster of Paris powder from DIY chalk paint projects.
Begin by mixing your plaster according to the box instructions in a container that can get messy (you may recognize my green sandwich container from my marbled ring dishes).

Then honestly, I just used my hands to spread the plaster mixture all over the pots.
I used a combo of dipping and rolling the pots into the container, and then just smearing it all around the pots. It was fun!
The ones from Magnolia have the texture covering them completely, and I could’ve done that with these too. But, I kind of liked where the terra cotta was still peeking through, so I left them partially covered.
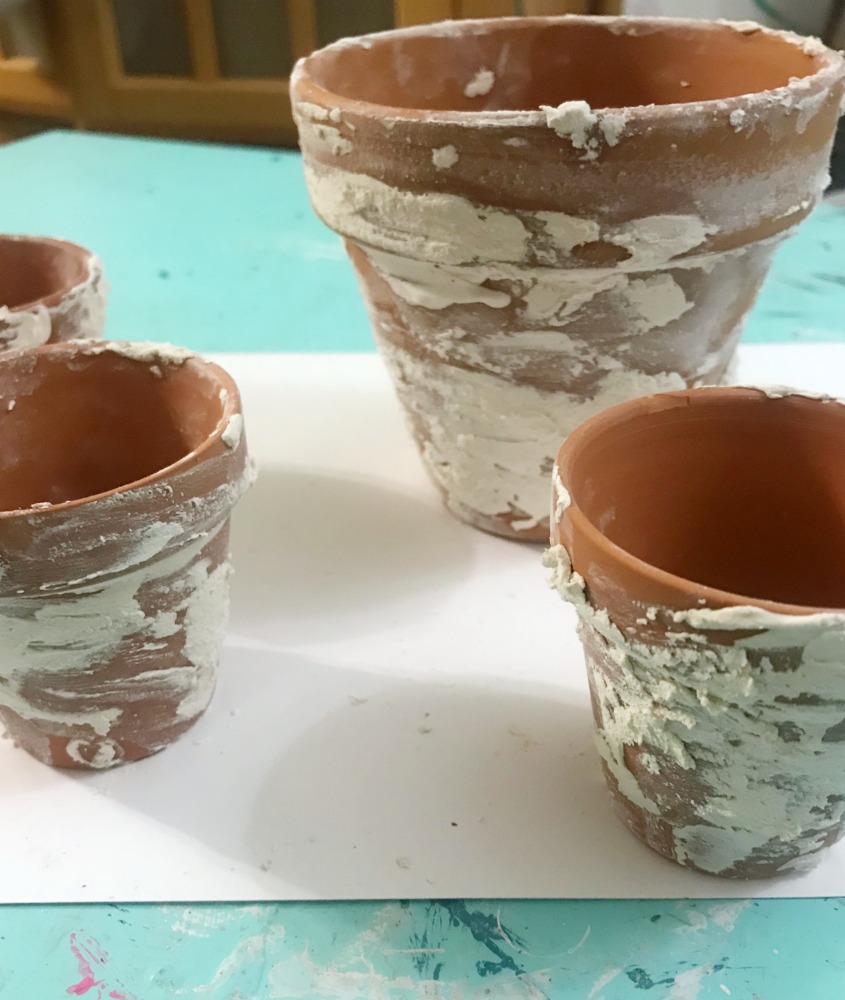
I let the Plaster of Paris dry overnight, and then to make the texture a bit more uniform, I used sandpaper to file it down a bit.

I used a damp cloth to wipe off any dust on the pots.
The next steps are a lot of layering watered down paint, and wiping off, until you achieve the look you want.
Using a damp paintbrush dipped into white paint, begin with a quick whitewash. If the paint is too thick, add a little more water to your brush, and use a dry cloth to wipe any excess back off.

Next, layer your greens and browns with the same damp brush, making sure you get down in the cracks of the plaster.
Don’t get your plaster too wet, or it may become sticky. You’ll have to work a little bit quickly to avoid this. If it does seem to be softening, just take a break for a bit and let it dry. You could also quick dry it with some heat from a hot blow dryer or a heat gun.
Keep layering your colors and white, until your clay pots look just right.

Even when I was finished with the paint, I still didn’t have enough of the terracotta color peeking through, so I sanded it again in random spots.

Just keep repeating this process until those beautiful green hues are perfect.
You’re finished when you’re happy with the outcome.
Now, these little dollar store clay pots look like they’ve been around for years and years and have great old stories to tell.
*Note- If you do choose to use real plants in these, make sure you use a plastic pot liner. Any moisture that comes in contact with the terra-cotta may seep through and dampen the plaster again.


Printable Instructions: Magnolia Inspired Aged Terracotta Clay Pots
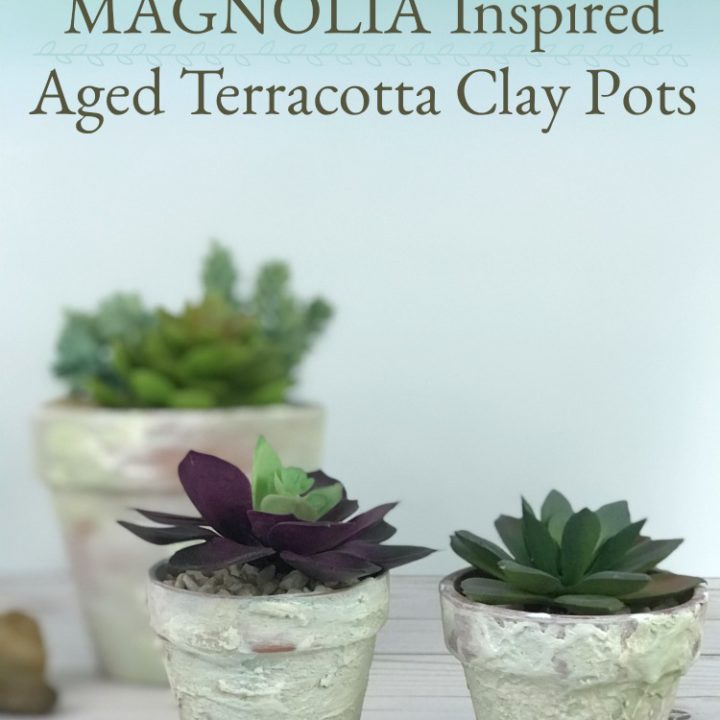
Magnolia Inspired Aged Terracotta Clay Pots
This tutorial will show you how to create beautiful, aged terra-cotta clay pots.
Tools
Instructions
- Begin by mixing your plaster according to the box instructions in a container that can get messy or be thrown away
- Spread the plaster onto the pots, you can use your fingers, a paint brush, dip them and roll them into the container with the plaster, etc. There's not a right or wrong way to do it, so have fun and get messy. You can cover the pots completely with the plaster, or leave a bit of the terra-cotta showing though, it's up to you how much you want to cover them.
- Let the plaster and pots dry completely overnight. Then, using a bit of sandpaper to take away any sharp edges and make the texture more uniform. (If you take off too much, you can always repeat step 2 and add more).
- Use a slightly damp cloth to wipe away any dust. *Note- reintroducing any moisture, wether through cleaning off the pot or with the paint can make the plaster soft again, so use very lightly.
- Thin your paint with water, and begin layering it onto your pots one color at a time, wiping off any excess in between coats, until you achieve your desired, weathered look you want. If the plaster seems too soft, wait a bit for it to dry before continuing.
- If you choose to use real plants in these, make sure you use a plastic pot liner. Any moisture that comes in contact with the terra-cotta may seep through and dampen the plaster again.
Recommended Products
As an Amazon Associate and member of other affiliate programs, I earn from qualifying purchases.


If you like this clay pot idea, you may enjoy these similar DIY tutorials I’ve shared as well…
Colorful Designs for Summer on Clay Pots

Modern & Vibrant Color Block Succulent Planters

Tiny Gold Leaf Succulent Planters

Be sure to check out what the rest of the creative bloggers who participated this month were able to create as well!
Molly, we’ve never met before, but I feel like I’ve known you forever!!! I just bought faux succulents and I won’t judge, ever! Also, I love old weathered pots and am always on the lookout. Now I don’t have to do that anymore. I’ll make them myself, thanks to your lovely idea and my recent purchase of plaster of paris and DIY Chalk Paint maneuvers, lol.
Don’t you just love the English language and all its exceptions to the rules? haha great tutorial on the pots (and I use faux succulents, too).
This would be an awesome way to give new life to pots you find at garage sales and thrifts stores this spring. Thanks for the idea!
No judging on the faux succulents – I killed all of my real ones last year. I love the look of the pots. Thank you for sharing an easy to duplicate tutorial.
Molly, I so LOVE your pots! Your process sorta gives them an “old world vintage” look. I’ve seen them done like this before, but didn’t know what to use. I have plenty of Plaster of Paris. I think I’m going to give this a try with some pots I have. It looks like fun, and I love anything with a vintage flair.
Visiting from the Challenge
I love the pots and I bet it was so fun to play with the Plaster of Paris. The look is great.
I have a lot of clay pots sitting in the garage – I can’t wait to decorate them! Pinning
I love the texture you added. Pinned this for when I find the terracotta pots I know are somewhere in my craft room!
I’ve seen tons of tutorials too, but I love how the plaster you use adds some dimension. Pinned.
Those turned out beautiful!
I get hung up on spellings sometimes, too. Mediterranean always seems to get me, but there’s no variation, hahaha. Your pots are super cute and this strikes me as a lovely Mother’s Day project to make with older children and tweens. My grandchildren are too young at the moment, although they’d probably love messing with the plaster of paris!
Fantastic post! I would love to join in this type of challenge next time around if you are accepting new bloggers! I will definitely be trying this craft soon!
Thanks for sharing in the To Grandma’s House We Go DIY, Crafts, Recipes and More Link party! Hope to see you again next week!
Back again! I just wanted to let you know that Thursday Favorite Things is live on my blog and I have featured you this week! I will also be sharing my TFT features on my fb, Follow The Yellow Brick Home. Happy Spring!
https://followtheyellowbrickhome.com/bunnies-and-blooms-at-thursday-favorite-things/